以前在论坛上下载openwrt,里面总是有些用不到的软件,或是需要的插件没有安装,尝试自己编译后做一下笔记
云编译
有网友提供在线编译网站,没什么人,不用排队编译也快,用不了2分钟就可以下载。不花钱的话里面会有一点广告,网址是https://openwrt.ai/
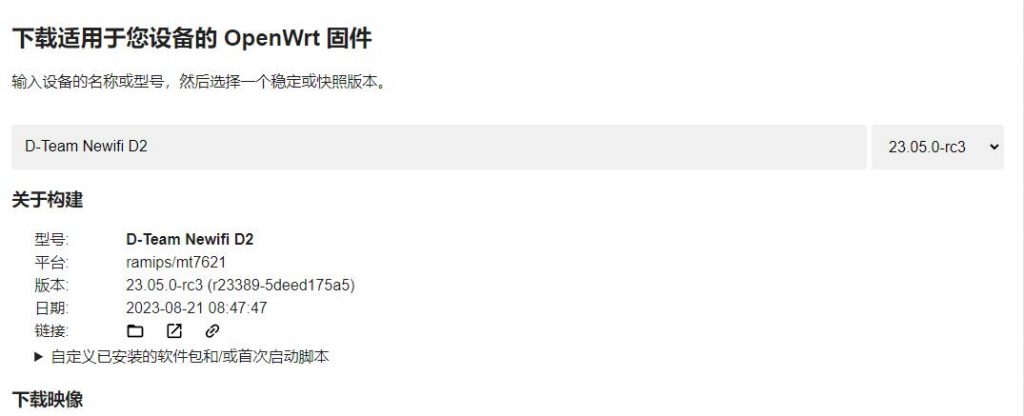
openwrt官网也可以自定义编译,在下载页面输入型号就会出现自定义构建的选项。下载页面的地址如下:https://firmware-selector.openwrt.org/
再就是用github进行编译,也是十分方便,我只是试了一下,没有深入研究。
本地编译
本地编译较复杂,但是有网友的手把手教学,跟着做也是很间单。大家可以参考这个网址:https://www.moewah.com/archives/4003.html
下面记录我搬运来的一些命令
创建用户
# 添加用户
adduser helloworld
#为新用户设置密码
passwd helloworld
#为该用户指定命令解释程序
usermod -s /bin/bash helloworld
#为该用户添加 sudo 权限
chmod u+w /etc/sudoers
vim /etc/sudoers
#找到这行 root ALL=(ALL) ALL 追加新行
helloworld ALL=(ALL:ALL) ALL
chmod u-w /etc/sudoers
#创建新用户会自动创建一个以用户名命名的新目录,需要为新目录添加读写权限
chown helloworld:helloworld -R /home/helloworld/
#从 root 用户切换使用新用户
su helloworld
本地环境
# 更新软件列表、升级软件包
sudo sh -c "apt update && apt upgrade -y"
#ubuntu 20.04 (推荐系统),安装依赖
sudo apt-get -y install build-essential asciidoc binutils bzip2 gawk gettext git libncurses5-dev libz-dev patch python3 python2.7 unzip zlib1g-dev lib32gcc1 libc6-dev-i386 subversion flex uglifyjs git-core gcc-multilib p7zip p7zip-full msmtp libssl-dev texinfo libglib2.0-dev xmlto qemu-utils upx libelf-dev autoconf automake libtool autopoint device-tree-compiler g++-multilib antlr3 gperf wget curl swig rsync
#ubuntu 18.04 安装依赖
sudo apt-get -y install build-essential asciidoc binutils bzip2 gawk gettext git libncurses5-dev libz-dev patch unzip zlib1g-dev lib32gcc1 libc6-dev-i386 subversion flex uglifyjs gcc-multilib g++-multilib p7zip p7zip-full msmtp libssl-dev texinfo libglib2.0-dev xmlto qemu-utils upx libelf-dev autoconf automake libtool autopoint device-tree-compiler antlr3 gperf wget swig rsync
编译
git clone https://github.com/coolsnowwolf/lede.git openwrt
cd ~/openwrt
# 添加自定义源
cat >> feeds.conf.default <<EOF
src-git kenzo https://github.com/kenzok8/openwrt-packages
src-git passwall https://github.com/xiaorouji/openwrt-passwall
EOF
#更新下载软件仓库的源码到本地,并安装自定义源包含的软件包
./scripts/feeds update -a && ./scripts/feeds install -a
# 添加 OpenAppFilter 应用过滤插件
git clone https://github.com/destan19/OpenAppFilter package/OpenAppFilter

# 删除自定义源默认的 argon 主题
rm -rf package/lean/luci-theme-argon
# 部分第三方源自带 argon 主题,上面命令删除不掉的请运行下面命令
find ./ -name luci-theme-argon | xargs rm -rf;
# 针对 LEDE 项目拉取 argon 原作者的源码
git clone -b 18.06 https://github.com/jerrykuku/luci-theme-argon.git package/lean/luci-theme-argon
# 替换默认主题为 luci-theme-argon
sed -i 's/luci-theme-bootstrap/luci-theme-argon/' feeds/luci/collections/luci/Makefile

# 设置默认IP为 192.168.199.1
sed -i 's/192.168.1.1/192.168.199.1/g' package/base-files/files/bin/config_generate

make menuconfig
make download -j8 V=s
make -j1 V=s

二次编译
# 更新软件列表、升级软件包
sudo sh -c "apt update && apt upgrade -y"
# 拉取最新源码
cd ~/openwrt && git pull
# 更新下载安装订阅源包含的软件包
cd ~/openwrt
./scripts/feeds update -a && ./scripts/feeds install -a

# 删除/bin和/build_dir目录中的文件
make clean
make dirclean
rm -rf ./tmp && rm -rf .config
make menuconfig
make download -j8 V=s
make -j1 V=s
编码完成后在bin目录下找固件
转载请注明:HANLEI'BLOG » 为自己编译一个openwrt